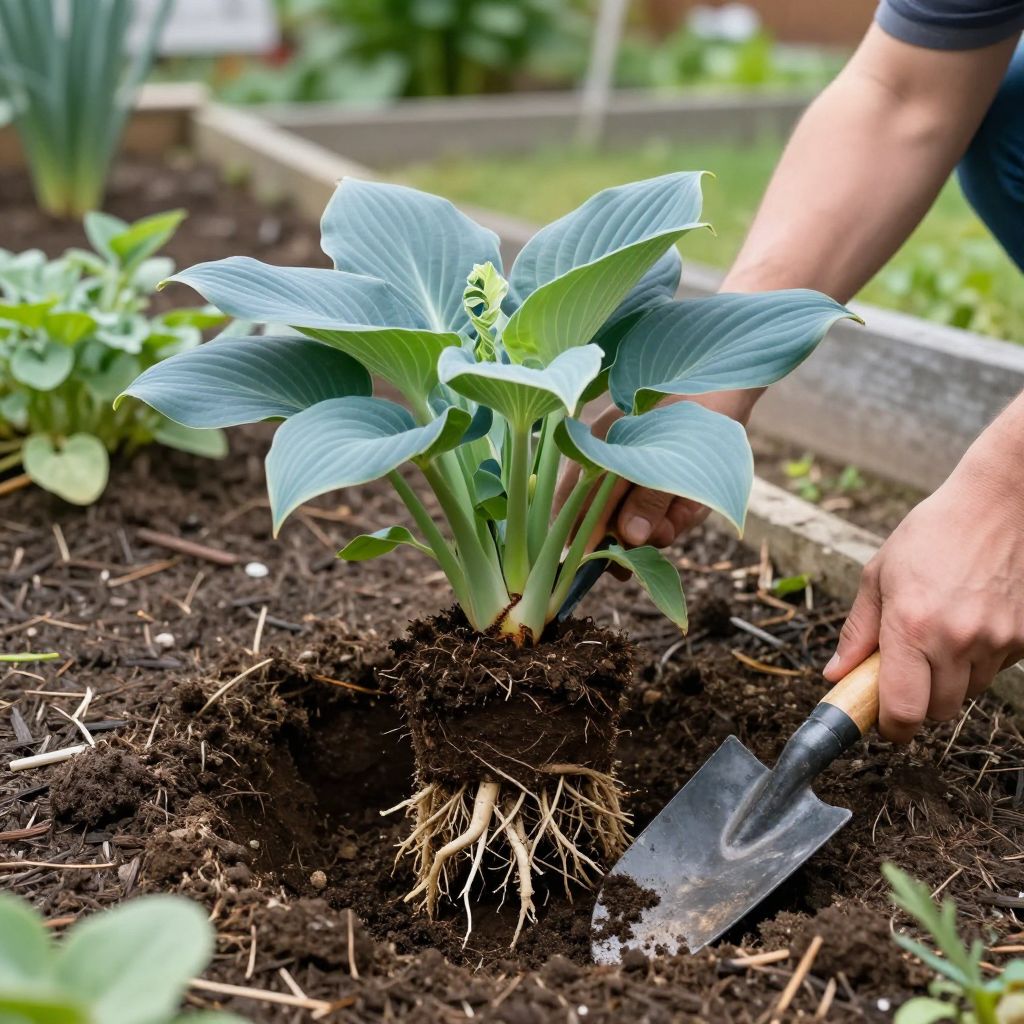
Wondering when to transplant hostas without stressing the plants? The best time is usually in early spring as new shoots emerge or in early fall when temperatures cool and the soil is still warm. Those windows help hostas re-establish roots before summer heat or winter cold arrives.
You can move hostas at other times if needed, but timing matters. A well-timed transplant reduces wilting, leaf scorch, and slow recovery, and it gives the plant the best chance to settle into its new spot quickly.
When to transplant hostas?
The best time to transplant hostas is early spring or early fall. In spring, move them just as the shoots are poking through the soil; in fall, transplant after the worst heat has passed but at least several weeks before the ground freezes. Cool weather and moist soil help roots recover faster.
Why timing matters for hosta transplants
Hostas are hardy perennials, but they dislike being disturbed during active stress periods. Hot, dry weather can make newly moved plants wilt quickly, while late-season moves may not leave enough time for roots to re-establish.
Good timing helps the plant spend energy on root growth instead of leaf production. That is especially important for larger, older clumps, which need more time to recover than small divisions.
Best seasons at a glance
- Early spring: ideal in many climates because shoots are just starting and moisture is often plentiful.
- Early fall: also excellent if the soil is still workable and there is time for new roots to form.
- Summer: possible, but higher risk unless you can water carefully and avoid heat waves.
- Late fall or winter: usually not recommended because roots may not establish before freezing conditions.
How to know a hosta is ready to move
Hostas are ready to transplant when they have outgrown their space, are crowding other plants, or are no longer getting the light they need. You may also want to move them if the soil stays too wet, the site has become too shady or too sunny, or the clump is simply too large for the bed.
Look for these signs:
- The clump has spread well beyond its original planting area.
- Leaves are smaller because the plant is crowded.
- The center of the clump is thinning or declining.
- Nearby shrubs or trees now shade the plant more than before.
- The soil around it is compacted, dry, or poorly drained.
How to transplant hostas step by step
Hostas are forgiving, but a careful move improves recovery. Work on a cool, cloudy day if possible, and water the plant the day before you dig if the soil is dry.
- Choose the new site first. Hostas prefer rich, moist, well-drained soil and partial shade, though some varieties tolerate more sun in cooler climates.
- Prepare the planting hole. Make it wider than the root ball and loosen the surrounding soil so roots can spread easily.
- Water the hosta well. Moist soil is easier to dig and less likely to crumble away from the roots.
- Dig around the clump. Start several inches away from the crown and lift as much root mass as you can.
- Divide if needed. Use a sharp spade or garden knife to separate the clump into sections with roots and at least one or two growing points.
- Replant at the same depth. Set the crown level with the surrounding soil; planting too deep can cause rot.
- Backfill and firm gently. Press the soil lightly to remove air pockets, but do not compact it hard.
- Water thoroughly. Deep watering helps settle the soil around the roots.
- Mulch lightly. A 2- to 3-inch layer of organic mulch helps conserve moisture, but keep it away from the crown.
Helpful tools
- Spade or digging fork
- Sharp knife or pruning saw for large clumps
- Garden gloves
- Bucket or tarp for moving divisions
- Watering can or hose
Can you transplant hostas in summer?
Yes, but summer transplanting is more stressful. If you must move a hosta during warm weather, do it on an overcast day, water deeply beforehand, and keep the plant shaded for a few days after transplanting if possible.
Summer moves work best when the hosta is small, the weather is mild, and you can keep the soil consistently moist without waterlogging it. Avoid transplanting during a heat wave or when the plant is already wilting from drought.
Extra care for summer transplants
- Trim back damaged leaves if they are badly torn or wilted.
- Use temporary shade cloth or a patio umbrella if the site gets harsh afternoon sun.
- Check soil moisture often; newly moved hostas dry out faster than established plants.
- Do not fertilize heavily right after moving, since that can add stress.
Should you divide hostas at the same time?
Often, yes. If a hosta clump is large, crowded, or declining in the center, transplanting is a good time to divide it. Division is easiest when the plant is just starting to grow in spring or when it is finishing the season in early fall.
Each division should have healthy roots and at least one or two buds, though larger divisions usually recover faster. Very small pieces can survive, but they may take longer to establish and fill out.
Soil, light, and drainage after transplanting
Hostas do best in soil that holds moisture but still drains well. They appreciate organic matter such as compost, which improves both texture and water retention. If your soil is heavy clay, loosen it well and avoid planting in spots where water pools after rain.
Light matters too. Most hostas prefer morning sun and afternoon shade, especially in warmer regions. In cooler climates, some varieties can take more sun if the soil stays evenly moist. If leaves scorch or bleach, the plant may need more shade; if growth is weak and stretched, it may need a brighter location.
What to avoid in the planting site
- Low spots with standing water
- Hot reflected heat from walls or pavement
- Dry root competition from large trees
- Deep shade so dense that the plant never gets enough light
Aftercare: helping hostas recover
The first few weeks after transplanting are the most important. Keep the soil evenly moist, especially if rain is scarce, but do not let the roots sit in soggy ground. New transplants usually benefit from steady moisture rather than frequent light sprinkling.
Watch for temporary wilting. Some leaf droop is normal right after the move, especially if roots were disturbed, but the plant should perk up as it re-establishes. If leaves continue to collapse or yellow rapidly, check for poor drainage, drought stress, or planting too deeply.
Simple recovery checklist
- Water deeply after planting and during dry spells.
- Keep mulch a few inches away from the crown.
- Remove badly damaged leaves if they are diseased or broken.
- Wait to fertilize until the plant shows new growth, if needed.
- Protect from slugs and snails, which often target tender new growth.
Common mistakes when transplanting hostas
A few avoidable errors can slow recovery or cause the plant to fail. The most common problem is moving hostas during hot, dry weather without enough water afterward.
- Planting too deep: the crown should sit at the same level it was growing before.
- Letting roots dry out: keep the root ball moist before and during the move.
- Choosing the wrong light: too much direct sun can scorch leaves, while too much shade can reduce vigor.
- Overcrowding the new hole: give roots room to spread.
- Skipping aftercare: newly transplanted hostas need consistent moisture to settle in.
Pests and problems to watch for after transplanting
Transplanted hostas can be more vulnerable to pests and stress while they recover. Slugs and snails are especially common, and they often chew ragged holes in new leaves. Deer and rabbits may also browse hostas if they are present in your area.
Fungal leaf spots can appear in humid weather or when leaves stay wet for long periods. Good spacing, morning watering, and removing heavily damaged foliage can help reduce issues. If the crown turns soft or smells rotten, the plant may be suffering from excess moisture or rot.
Conclusion: the best move for healthy hostas
If you are deciding when to transplant hostas, aim for early spring or early fall whenever possible. Those seasons give the roots the best chance to settle in before heat or frost creates extra stress.
Before you dig, choose a suitable site, prepare the soil, and plan for steady aftercare. If you want more ideas for shade beds and perennial maintenance, consider reading related gardening guides on dividing perennials and improving garden soil.