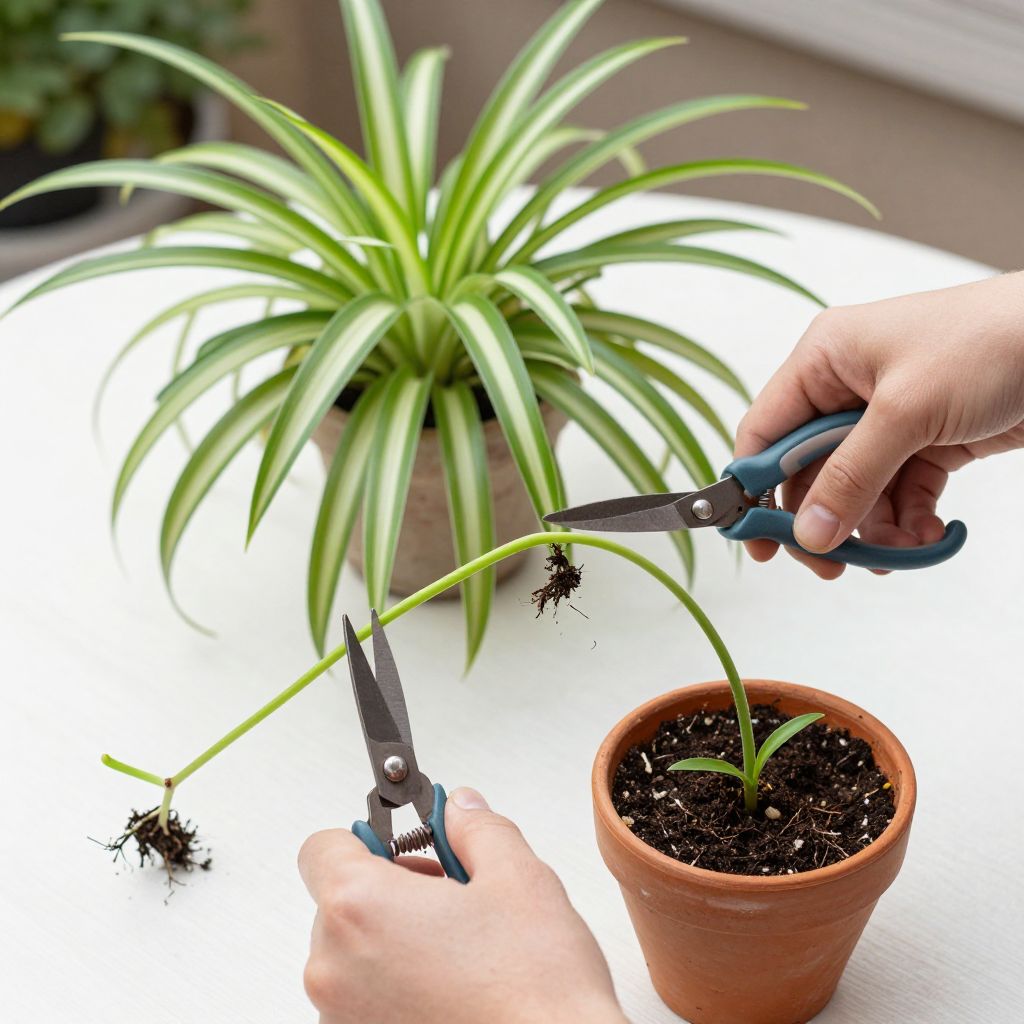
If you’re wondering where to cut a spider plant to propagate, the short answer is: cut the baby plantlet from the runner, not the main crown. Make the cut close to the plantlet’s base, leaving a small section of stem attached if possible, then root it in water or moist potting mix.
Spider plants are one of the easiest houseplants to multiply, but a clean cut and the right timing make a big difference. With a healthy mother plant, a little patience, and the right growing conditions, you can turn one plant into several without stressing either one.
Where To Cut A Spider Plant To Propagate?
Cut the runner—the thin arching stem that carries the baby spider plant—just on the mother-plant side of the plantlet, or cut the plantlet free very close to its base if you want to root it separately. Avoid cutting into the crown or leaves of the main plant, since that can slow growth and invite rot.
What Part of the Spider Plant Do You Cut?
Spider plants (Chlorophytum comosum) produce long stems called runners or stolons. These runners hold small plantlets, often called “babies,” which are the easiest part to propagate.
Best cutting location
- Cut the runner between the mother plant and the plantlet if you want to remove the baby cleanly.
- Leave a short piece of runner attached to the plantlet if you can; it gives you something easier to handle.
- If the baby already has visible roots, you can cut it off and pot it up right away.
Where not to cut
- Do not cut into the central crown of the mother plant.
- Do not trim the leaves to “make room” for propagation.
- Do not cut so close to the plantlet that you damage its base or tiny root nubs.
How To Tell When a Spider Plant Baby Is Ready
Not every plantlet needs to be cut the moment you see it. The best time is when the baby is large enough to survive on its own, usually with a few leaves and, ideally, small roots forming at the base.
Signs it’s ready
- The plantlet is at least a few inches long and has several leaves.
- Small root nubs or roots are visible at the base.
- The baby feels firm, not shriveled or weak.
- The mother plant is healthy and actively growing.
If the baby is tiny, you can leave it attached a little longer. The runner keeps feeding it while it develops, which often improves success.
Step-by-Step: How To Propagate Spider Plant Babies
You can root spider plant babies in water or directly in soil. Both work well, but soil often produces sturdier roots for long-term growth.
Method 1: Rooting in water
- Use clean scissors or pruners.
- Cut the runner just behind the plantlet.
- Place the base of the baby in a small glass or jar of water, keeping the leaves above the waterline.
- Set it in bright, indirect light.
- Change the water every few days to keep it fresh.
- When roots are about 1 to 2 inches long, pot it into soil.
Method 2: Rooting directly in potting mix
- Fill a small pot with a light, well-draining houseplant mix.
- Moisten the mix so it’s evenly damp, not soggy.
- Cut the baby from the runner.
- Set the base of the plantlet into the soil and gently firm it in place.
- Keep the soil lightly moist while roots establish.
If the plantlet is floppy, you can use a small stake, a bent paper clip, or a little extra soil around the base to keep it steady.
How To Cut Without Damaging the Mother Plant
The mother spider plant should keep growing after you remove the babies, as long as you make clean cuts and avoid overharvesting. A stressed plant may slow down, so take only a few plantlets at a time if the mother plant is small.
Use the right tools
- Sharp scissors, snips, or pruners
- Rubbing alcohol or soap and water for cleaning tools
- Small pots if you’re planting directly into soil
Good cutting habits
- Make one clean cut instead of tearing the runner.
- Cut in bright light so you can see exactly where the runner meets the plantlet.
- Remove only healthy babies; skip any that look damaged, mushy, or weak.
Clean tools matter because ragged cuts heal more slowly and can increase the chance of rot or disease.
Best Growing Conditions After Propagation
Newly propagated spider plants do best in bright, indirect light and evenly moist, well-draining soil. They are adaptable, but strong direct sun can scorch young leaves, and heavy, waterlogged soil can rot tender roots.
Light
- Bright, indirect light is ideal.
- A few hours of gentle morning sun may be fine in some climates.
- Harsh midday or afternoon sun can dry or bleach young plantlets.
Soil and potting mix
- Use a loose indoor potting mix that drains well.
- A mix with perlite or similar aeration material helps prevent soggy roots.
- Choose a pot with drainage holes.
Watering
- Water lightly after potting, then keep the mix evenly moist while roots establish.
- Do not let the pot sit in standing water.
- Once established, allow the top layer of soil to dry slightly between waterings.
Spider plants prefer consistency. Big swings from very dry to very wet can cause browning tips, weak roots, or stalled growth.
Common Mistakes When Cutting Spider Plants
Most propagation problems come from cutting too early, using poor conditions, or overwatering. A few simple corrections usually fix the issue.
1. Cutting the wrong part
If you cut the crown of the mother plant instead of the runner, you can damage the main plant. Always follow the thin arching stem to the baby plantlet.
2. Removing babies too soon
Very small plantlets often struggle on their own. Wait until they have some size and, ideally, a few root nubs before separating them.
3. Using heavy soil
Dense, compact soil holds too much water around the base of the cutting. Use a light mix that drains freely.
4. Overwatering after potting
Moist is good; soggy is not. If the base turns soft or dark, reduce watering and improve drainage.
5. Too much direct sun
New cuttings can dry out quickly in strong sun. Move them to bright, filtered light instead.
What To Do If the Cutting Fails
Sometimes a baby spider plant wilts, turns mushy, or never roots. That does not always mean the whole plant is lost.
- Wilting: Check moisture and light. A dry cutting may need a small drink; a soggy one may need fresh, drier mix.
- Rotting base: Cut away damaged tissue and try again with a healthier baby.
- No roots after several weeks: Give more bright indirect light and keep temperatures moderate.
- Brown leaf tips: Often caused by inconsistent watering, low humidity, or mineral buildup in water.
If you’re propagating in water, remember that water roots and soil roots can behave a little differently. When transferring to soil, keep the mix lightly moist for the first week or two so the plant can adjust.
When To Propagate Spider Plants
Spider plants can produce babies during active growth, often more freely in spring and summer indoors, though timing depends on your light and temperature. If your plant is healthy and making runners, you can propagate whenever the plantlets are large enough.
In cooler seasons or low-light homes, growth may slow. In that case, it’s often better to wait until the plant is actively pushing new growth rather than forcing propagation from weak babies.
Quick Checklist Before You Cut
- The baby spider plant is large enough to handle.
- You can see where the runner connects to the plantlet.
- Your scissors or snips are clean and sharp.
- You have water or a small pot ready.
- The new plant will go into bright, indirect light.
Conclusion
To propagate a spider plant successfully, cut the runner just behind a healthy baby plantlet, not into the mother plant’s crown. Then root the baby in water or well-draining potting mix, keep it in bright indirect light, and avoid soggy soil while it establishes. If you want to keep learning, look for more indoor plant care guides on spider plant maintenance, repotting, and watering basics.