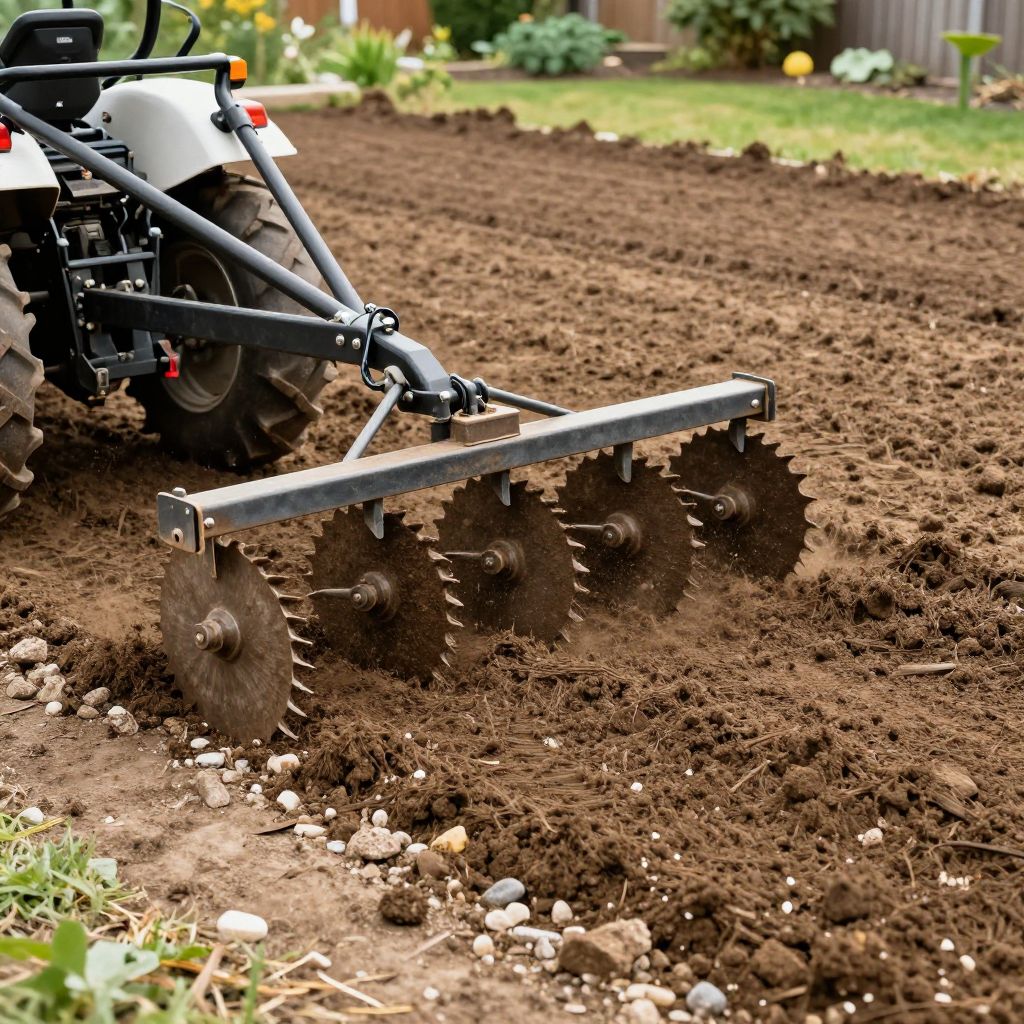
If you’ve heard the term and wondered, “What is a Harley rake?” you’re probably looking at a landscaping tool, not a plant. A Harley rake is a heavy-duty soil preparation attachment used to level ground, break up clods, remove debris, and create a smooth seedbed before planting grass, installing sod, or finishing a garden area.
For home gardeners, it’s especially useful when you need to turn rough, uneven soil into a clean, workable surface. Understanding what it does can help you decide whether you need one, how to use it safely, and when a simpler garden tool may be enough.
What Is A Harley Rake?
A Harley rake is a powered landscaping attachment, usually mounted to a skid steer or compact tractor, that spins tines across the soil to loosen, sift, and level the surface. It removes rocks, roots, and debris while creating a fine, even finish for lawns, beds, and site prep.
How a Harley Rake Works
The tool uses a rotating drum with strong tines or teeth that comb through the top layer of soil. As it moves, it breaks up compacted ground, pulls out small stones and sticks, and redistributes soil to smooth low spots.
Many models also have a grading blade or adjustable gauge wheels to control depth. That means you can shape the surface without digging deeply into the subsoil, which is important when you want a level finish rather than a major excavation.
What it is best for
- Preparing a lawn area for seeding or sod
- Cleaning up construction-disturbed soil
- Leveling rough ground before landscaping
- Removing small debris from the top few inches of soil
- Creating a smoother finish than a box blade alone
When You Might Need One in the Garden
Most home gardens do not need a Harley rake for everyday planting. It becomes useful when the site is large, uneven, or full of debris after digging, grading, or renovation.
If you are establishing a new lawn, rebuilding a neglected yard, or preparing a broad landscape bed, a Harley rake can save time and produce a more uniform surface than hand raking alone.
Good situations for using one
- New home construction sites with rough fill soil
- Yards with shallow rocks, roots, and clumps
- Areas that need grading before turf installation
- Large beds where you want a smooth, even finish
- Sites where topsoil needs to be spread and refined
When a Harley rake is not necessary
- Small vegetable beds
- Established flower borders
- Light spring cleanup
- Container gardening
- Minor leveling jobs that can be handled with a garden rake, shovel, and hand tamper
How It Differs from Other Landscaping Tools
Gardeners often confuse a Harley rake with other grading tools. The main difference is that a Harley rake both loosens and finishes the surface, while many other tools only move soil around.
Harley rake vs. landscape rake
A landscape rake is usually a simpler attachment or hand tool that drags across the surface to gather debris and smooth soil. A Harley rake is more aggressive and better at breaking up clods and refining the top layer.
Harley rake vs. box blade
A box blade is designed more for cutting, moving, and leveling soil in larger amounts. A Harley rake is better for finishing work and cleaning the surface after rough grading is done.
Harley rake vs. power rake
Some people use “power rake” to describe similar equipment, but the term can also refer to dethatching tools for lawns. In landscaping, a Harley rake usually means the heavier soil-conditioning attachment used for grading and cleanup.
How to Use a Harley Rake Effectively
If you hire a contractor, this tool is often used as part of site prep. If you operate one yourself, the goal is to work slowly and avoid digging too deep. The best results come from multiple light passes rather than one aggressive pass.
- Clear the area of large debris, wire, buried trash, and anything the rake should not hit.
- Rough-grade the site first if there are major dips or mounds.
- Set the rake depth shallow at the start.
- Make a slow pass to loosen the top layer and collect debris.
- Adjust angle or depth as needed to refine low spots.
- Check for drainage slope so water will move away from structures.
- Finish by hand-raking edges and tight corners the machine cannot reach.
Do not try to fix major grade problems with the rake alone. If the area has deep ruts, standing water, or a poor slope, you may need additional soil work before finishing.
Soil Conditions That Affect Results
A Harley rake works best when the soil is neither too wet nor bone dry. Moist soil breaks apart more easily, but overly wet soil can smear, compact, and clump.
Very dry, hard soil may need pre-wetting or a separate loosening pass first. If the ground is rocky or full of buried roots, the rake can remove smaller debris, but larger material should be dug out by hand or with heavier equipment.
Best soil conditions
- Moderately moist, workable soil
- Loose topsoil or recently disturbed ground
- Sites with small stones and organic debris
- Areas that need fine leveling rather than deep excavation
Problem soil conditions
- Sticky clay that smears when wet
- Very compacted subsoil
- Ground with hidden utility lines or irrigation parts
- Large rocks or construction debris
Common Mistakes to Avoid
Because the tool is powerful, it is easy to overwork the site. That can leave the soil too loose, too smooth on top, or stripped of healthy topsoil structure.
- Working too deep: This can pull up poor subsoil and bury better topsoil.
- Using it on wet ground: Wet soil compacts and can create a smeared surface.
- Skipping rough grading: The rake is a finisher, not a cure for major elevation problems.
- Ignoring drainage: A perfectly smooth surface can still hold water if the slope is wrong.
- Leaving large debris in place: Big rocks, roots, and construction waste can damage equipment.
What to Do After Harley Raking
Once the surface is smooth, the next steps depend on your project. For lawns, you may seed or lay sod. For beds, you may add compost, mulch, or planting soil as needed.
Before planting, walk the area and check for soft spots, hidden debris, and drainage issues. A quick hand inspection helps you catch problems that a machine may miss.
Aftercare for lawn projects
- Rake out any remaining loose debris by hand
- Add a thin layer of topsoil or compost if needed
- Seed or sod according to your local season and climate
- Water gently to settle the surface without washing seed away
Aftercare for garden beds
- Blend in compost where soil is poor or compacted
- Check that beds are not lower than surrounding paths
- Mulch after planting to reduce erosion and moisture loss
- Keep heavy foot traffic off the finished surface
Do Home Gardeners Need to Buy One?
Usually, no. A Harley rake is expensive and requires the right machine to run it. Most home gardeners are better off renting one for a large project or hiring a landscaper for a one-time site-prep job.
If your work is limited to small beds, raised planters, or routine maintenance, hand tools are more practical. A shovel, bow rake, landscape rake, and wheelbarrow are often enough for everyday gardening tasks.
How to Decide Whether It Is Worth It
Ask yourself how much area you need to prepare, how uneven the site is, and whether you need a professional finish. The bigger and rougher the project, the more useful a Harley rake becomes.
- Choose one if you are preparing a large lawn or landscape area.
- Rent one if you only need it for a single renovation project.
- Skip it if you are working in a small garden bed or container area.
Practical Takeaway for Gardeners
A Harley rake is not a plant or a gardening technique; it is a soil-finishing tool used to clean, level, and prepare ground for landscaping and planting. It is most valuable on large, rough sites where you need a smooth, debris-free surface.
If you are planning a lawn renovation or a major bed overhaul, start by assessing the grade, drainage, and soil condition first. Then decide whether a Harley rake, a simpler hand tool, or professional help is the best fit for your project. For more site-prep guidance, you may also want to read about how to improve garden soil and how to level a yard for planting.