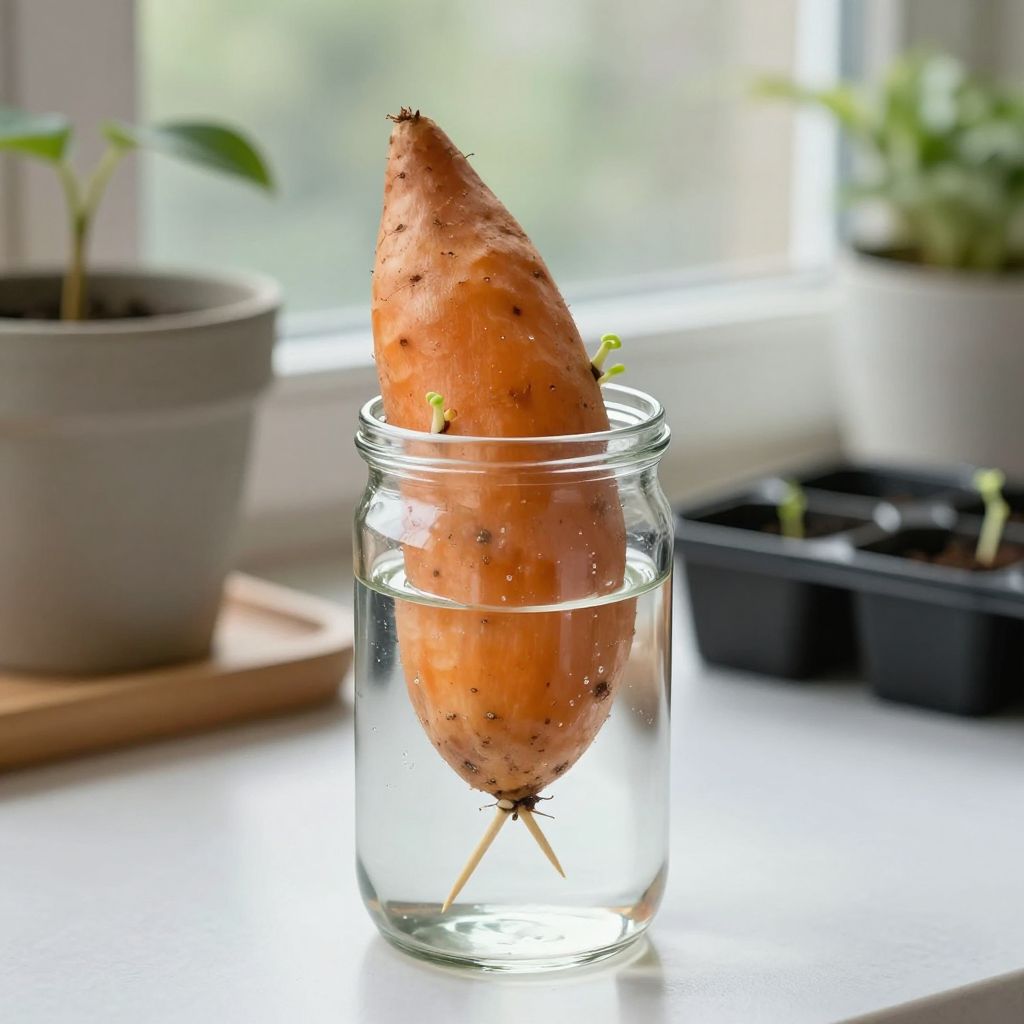
Which end of sweet potato goes in water? If you want to sprout slips for planting, the end with the most obvious growth buds is the one to place in water. In practice, that usually means the end that was closest to the stem, not the tapered root end.
Getting the orientation right helps the tuber sprout faster and more reliably. Once you know which side to use, the rest is mostly about clean water, warmth, and enough light to keep the slips healthy.
Which end of sweet potato goes in water?
Place the stem end of the sweet potato in water, not the tapered root end. The stem end is usually flatter and may show small “eyes” or buds where slips emerge. If you are unsure, set the tuber so the broader, flatter end is down and keep the upper portion exposed to air and light.
How to tell the stem end from the root end
Sweet potatoes can be confusing because they do not always look perfectly symmetrical. A little observation makes the job much easier.
Look for these clues
- Stem end: usually flatter, broader, and may have small buds or tiny scars where the vine was attached.
- Root end: often more tapered or pointed, with a smoother look.
- Best orientation for water rooting: the stem end goes in the water, while the upper portion stays above the surface.
If both ends look similar, do not worry. Sweet potatoes are forgiving, and many will still sprout as long as they are kept warm and moist.
How to sprout sweet potato slips in water
Growing slips in water is a simple way to start new plants from a sweet potato. It works best when the tuber is healthy, unblemished, and not refrigerated for too long before use.
What you need
- A healthy sweet potato
- A jar, glass, or shallow container
- Toothpicks, if needed, to suspend the tuber
- Clean water
- A bright indoor spot with warmth
Step-by-step method
- Choose a firm sweet potato with no soft spots or mold.
- Identify the stem end and place that end in water.
- If needed, insert toothpicks around the middle so the lower end rests in water and the upper end stays above it.
- Set the container in a warm, bright location out of direct scorching sun.
- Change the water regularly to keep it fresh and reduce rot.
- Wait for sprouts to form, then let them grow into slips before removing them for planting.
For most home gardeners, the goal is not to root the entire tuber permanently. The goal is to produce healthy slips, which are the vine shoots you will later plant in soil.
Best conditions for sprouting sweet potatoes
Sweet potatoes are warm-season plants, and their slips respond best to steady warmth and brightness. Cold conditions slow sprouting and increase the risk of rot.
Light
Give the tuber bright light, such as a sunny windowsill or a well-lit indoor space. Bright indirect light is often enough, though some morning sun can help. Too little light can produce weak, pale slips.
Temperature
Warmth matters more than many beginners expect. A consistently warm room encourages sprouting, while cool conditions can stall the process. Avoid placing the container near cold windows or drafty doors.
Water quality
Use clean water and refresh it often. Stagnant water can encourage odor, mold, and decay. If the water turns cloudy or smells off, replace it immediately and rinse the container.
Common mistakes to avoid
Most problems with sweet potato slips come from orientation, excess moisture, or poor tuber quality. A few simple corrections usually solve them.
- Using the wrong end: the root end may not sprout as well as the stem end.
- Submerging too much of the tuber: only the lower portion should touch water.
- Letting water go stale: change it regularly to reduce rot.
- Starting with a damaged tuber: soft spots and mold often spread quickly.
- Keeping it too cool: slow growth and poor slip development are common in chilly rooms.
If the sweet potato begins to soften, darken, or smell unpleasant, remove it and start over with a healthier tuber. A small amount of surface blemish is not always a problem, but mushy tissue is a warning sign.
What to do when sprouts appear
Once sprouts emerge, let them grow into slips before separating them. Slips are the young shoots you will root and transplant into the garden or containers.
When slips are ready
Wait until the shoots are several inches long and have a few leaves. At that point, they are strong enough to be cut or gently twisted off for rooting.
How to remove slips
- Hold the slip near its base.
- Gently twist or cut it away from the tuber.
- Place the slip in water or a moist growing medium until roots form.
- Transplant once roots are established and outdoor conditions are warm enough.
You can often harvest several slips from one sweet potato over time. Remove only what is ready, and leave the tuber in place to keep producing more shoots.
Planting sweet potato slips after water propagation
Once rooted, slips can be planted in well-drained soil, raised beds, or large containers. Sweet potatoes need warmth, room to spread, and soil that does not stay soggy.
Soil and drainage
Choose loose, fertile soil with good drainage. Heavy, compacted soil can produce misshapen roots and make harvest difficult. Adding compost can improve structure, but avoid overly rich, nitrogen-heavy soil that encourages leaves more than tubers.
Sunlight
Sweet potatoes grow best in full sun in most climates. More sun usually means stronger growth, but local heat and exposure matter. In very hot regions, some afternoon protection may help young transplants settle in.
Spacing and support
Give the vines room to spread. Sweet potatoes are not climbing plants that need trellises in the usual sense; they trail and root along the ground if allowed. Keep vines where they will not be trampled or tangled with other crops.
Watering and care after transplanting
After planting, keep the soil evenly moist while slips establish. Once the plants are growing well, they prefer consistent moisture rather than frequent soaking.
- Water deeply after transplanting.
- Let the top layer of soil dry slightly between waterings.
- Avoid waterlogged beds, especially in cool weather.
- Mulch lightly if your climate is hot and dry, but keep mulch away from the stems.
Too much water can cause weak growth and rot, while too little water can stress young plants and reduce root development. Adjust based on rainfall, soil type, and container size.
Pests and problems to watch for
Sweet potatoes are fairly tough, but they can still face pest and disease issues. Starting with healthy slips and clean containers reduces the risk.
During water sprouting
- Rot: usually caused by stale water, a damaged tuber, or too much submersion.
- Mold: often appears when humidity is high and water is not changed often enough.
- Weak, pale shoots: usually a sign of low light.
After planting
- Slugs and snails: can chew young plants in damp gardens.
- Vine damage: can happen from foot traffic or garden tools.
- Root problems: are more likely in compacted or poorly drained soil.
If you notice trouble early, remove damaged material, improve airflow, and correct watering before the issue spreads.
Indoor vs. outdoor starting: what changes?
Starting sweet potato slips in water indoors is the most common approach because it gives you control over warmth and light. Outdoors, the same basic rules apply, but weather becomes the main limiting factor.
Indoors
Indoors, you can manage warmth, light, and water quality more easily. This is especially useful in cool climates or early in the season.
Outdoors
Outdoors, wait for reliably warm conditions before moving slips into the garden. Cold nights can stunt growth, even if the plants look healthy at first.
Simple troubleshooting guide
If your sweet potato is not sprouting, the problem is usually easy to diagnose.
- No sprouts after a while: the tuber may be too cold, too old, or not a good sprouting specimen.
- Only roots, no shoots: increase light and warmth.
- Soft, smelly tuber: discard it and start with a firmer one.
- Thin, leggy slips: move to brighter light.
Patience helps here. Some sweet potatoes sprout quickly, while others take longer depending on storage history and growing conditions.
Conclusion: the right end to use and the next step
The short answer is simple: put the stem end of the sweet potato in water. Keep the tuber warm, bright, and only partly submerged, then wait for slips to form. When the shoots are several inches long, remove and root them before planting in well-drained soil.
If you want to keep learning, read more about preparing garden soil and choosing the best container setup for warm-season crops before you transplant your sweet potato slips.