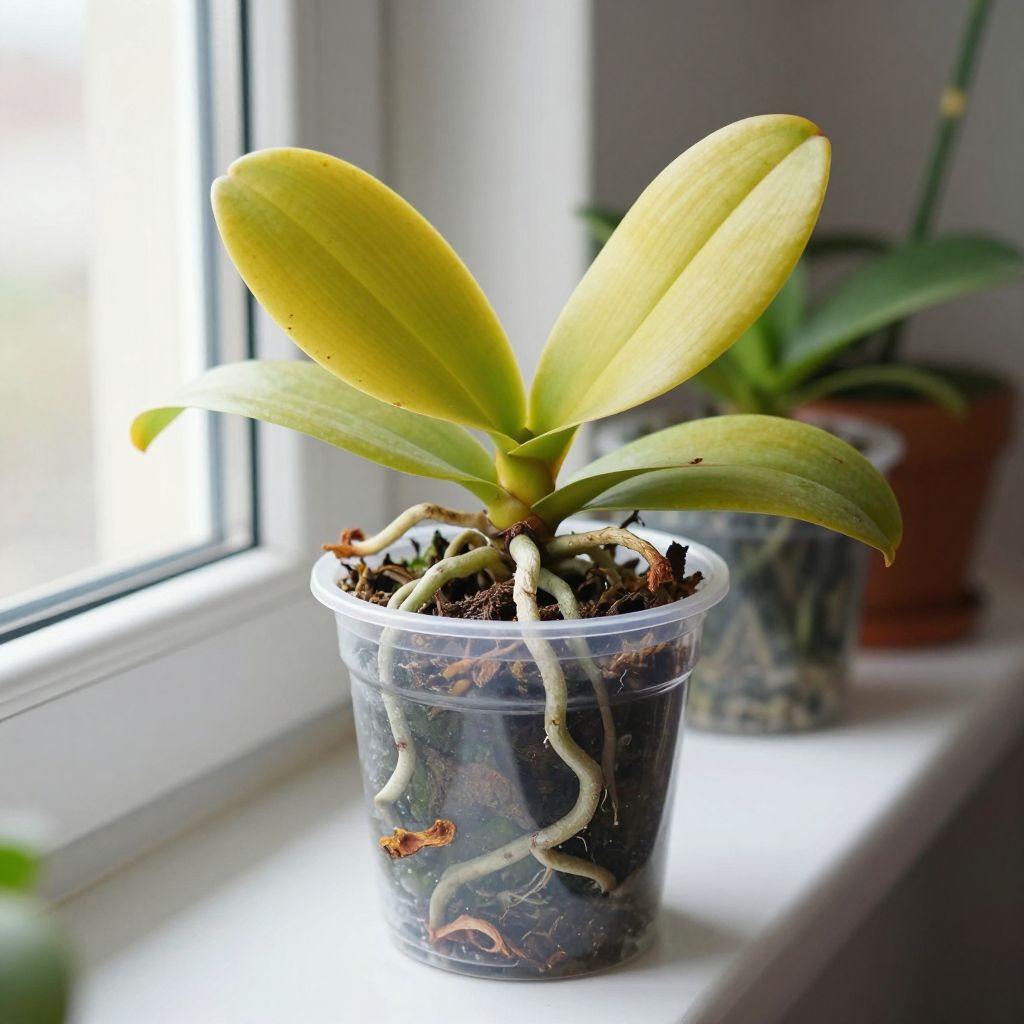
Why is my orchid dying? In most cases, the plant is not truly dying so much as reacting to a care problem such as too much water, poor drainage, low light, or damaged roots. Orchids can recover well if you identify the cause early and adjust the growing conditions before the plant loses too many leaves or roots.
The good news is that many common orchid problems are fixable. If you learn how to read the leaves, roots, and potting mix, you can usually tell whether your orchid needs less water, more light, fresh medium, or a rescue from rot or pests.
Why is my orchid dying?
Most orchids decline because their roots are stressed. The usual causes are overwatering, old or compacted potting mix, poor drainage, insufficient light, cold drafts, sun scorch, or pests and disease. Check the roots first: firm green or silvery roots are healthy, while mushy brown roots usually mean rot.
Start with the roots: the fastest way to diagnose an orchid
Orchids often show problems above ground only after the roots have already been damaged. If the leaves are wrinkling, yellowing, or dropping, gently inspect the root system and potting medium before changing anything else.
Healthy root signs
- Firm roots that feel plump, not hollow or mushy
- Green roots when wet, silvery-white roots when dry
- A potting mix that dries gradually but does not stay soggy
- Leaves that are firm rather than limp or leathery
Root rot warning signs
- Brown, black, or translucent roots
- Soft roots that collapse when squeezed
- Musty smell from the pot
- Leaves losing firmness despite regular watering
If the roots are mostly healthy, the problem is likely environmental. If many roots are damaged, the orchid needs repotting and cleanup before it can recover.
Common causes of orchid decline and how to fix them
1. Overwatering
Overwatering is the most common reason orchids fail indoors. Orchids need moisture, but they also need air around the roots. When the mix stays wet too long, roots suffocate and rot.
What to do:
- Check the potting mix with your finger or a wooden skewer.
- Water only when the mix is nearly dry, not constantly damp.
- Empty any saucer or cachepot after watering.
- Use a pot with drainage holes.
For many common house orchids such as Phalaenopsis, watering needs change with temperature, light, pot size, and season. A plant in warm bright conditions may dry faster than one in a cool room. Always adjust to your home rather than following a fixed schedule.
2. Poor drainage or the wrong potting mix
Orchids do not grow well in ordinary dense potting soil. Their roots need a chunky, airy medium that drains quickly, such as bark-based orchid mix. As that mix breaks down, it holds too much water and reduces airflow.
Fix it by repotting if:
- The mix has turned fine, soggy, or compacted
- Water sits in the pot for a long time
- The plant has been in the same mix for two years or more
- Roots are circling, crowded, or rotting
Repot into fresh orchid medium and a clean pot with drainage. Trim only dead, mushy roots with sterilized scissors. Leave firm roots in place.
3. Too little light
Orchids often weaken when they do not get enough bright, indirect light. Low light can cause slow growth, deep green leaves, and poor flowering. Over time, the plant may look healthy but gradually decline because it cannot produce enough energy.
Signs of low light:
- No new leaves or roots for long periods
- Few or no blooms
- Dark green leaves that look lush but grow slowly
- Weak, floppy growth
Move the orchid to a brighter spot near an east- or south-facing window with filtered light, or use a sheer curtain to soften strong sun. Avoid sudden moves into intense direct sun, which can scorch leaves.
4. Too much direct sun
While orchids need bright light, direct midday sun can burn the leaves. Sun scorch often appears as pale, yellow, or brown patches on the upper leaf surface.
How to correct it:
- Shift the plant out of direct afternoon sun
- Use a sheer curtain or place it a little farther from the window
- Keep damaged leaves in place unless they are fully dead; they still help the plant recover
Brown scorched areas will not turn green again, but preventing more damage gives the orchid a chance to regrow.
5. Temperature stress and drafts
Orchids dislike sudden temperature swings. Cold windows, heating vents, air conditioners, and drafty doorways can stress the plant and cause bud drop, leaf yellowing, or stunted growth.
Keep orchids in a stable indoor location with good air movement but no harsh drafts. If your orchid lives outdoors in warm weather, bring it in before nights turn cool unless you know it is suited to your climate.
6. Watering the crown or leaves too often
Water trapped in the crown of a monopodial orchid, especially Phalaenopsis, can lead to crown rot. This is especially risky in cool, low-airflow conditions.
Prevention tips:
- Water early in the day so excess moisture can evaporate
- Avoid leaving water pooled in the leaf center
- Improve airflow around the plant
- Blot standing water gently with a tissue if needed
7. Fertilizer burn or salt buildup
Too much fertilizer can damage orchid roots and make leaf tips turn brown. Salt buildup from repeated feeding or hard water can also stress the plant.
If you suspect fertilizer burn, flush the pot thoroughly with clean water and pause feeding for a while. Use a diluted orchid fertilizer only when the plant is actively growing, and reduce feeding if the plant is stressed, dormant, or recently repotted.
8. Pests and disease
Mealybugs, scale, spider mites, and fungal or bacterial infections can weaken orchids. Small infestations may go unnoticed until leaves yellow, spots spread, or sticky residue appears.
Inspect the undersides of leaves, leaf joints, and the potting surface. Look for:
- Cottony white clusters from mealybugs
- Brown bumps from scale
- Fine webbing or stippled leaves from spider mites
- Soft black areas, spreading spots, or foul odor from rot
Remove pests manually where possible, isolate the plant from others, and improve airflow. For disease, cut away affected tissue with sterilized tools and keep water off damaged areas.
How to save a struggling orchid step by step
If your orchid looks weak, follow a simple rescue process rather than changing everything at once. The goal is to reduce stress and help the roots recover.
- Unpot the plant and inspect the roots. Remove old mix and rinse the roots gently if needed.
- Trim dead roots. Cut only soft, hollow, or blackened roots with clean scissors.
- Repot into fresh orchid mix. Use a well-draining bark-based medium and a pot with drainage holes.
- Place in bright, indirect light. Avoid hot direct sun while the plant recovers.
- Water carefully. Let the mix dry slightly between waterings.
- Hold fertilizer for a few weeks. Let new roots start before feeding again.
If the plant has very few roots left, keep it in a small pot so the medium does not stay wet too long. A larger pot is not better for a damaged orchid.
How to tell whether your orchid can recover
Many orchids can bounce back if at least some roots and one healthy growing point remain. Recovery is slower when the plant has lost most of its roots, but it is still possible in many cases.
Better recovery signs
- Firm green or silvery roots remain
- New root tips or leaf growth appear
- The crown or growth point is still firm
- The plant responds to improved care within a few weeks
More serious warning signs
- The base of the plant is soft and collapsing
- All roots are dead and there is no new growth
- Rot has spread into the crown or stem
- The plant smells rotten and continues to decline after repotting
Even then, do not give up too quickly. Orchids can take time to show improvement, especially after root damage.
Preventing future orchid problems
Once your orchid is stable, the best prevention is consistent, attentive care. Orchids do not need complicated routines, but they do need the right balance of light, air, moisture, and drainage.
- Use a potting mix made for orchids, not standard houseplant soil
- Water only when the roots or mix indicate dryness
- Keep the pot in bright, indirect light
- Provide gentle airflow around the plant
- Repot when the mix breaks down or roots outgrow the container
- Inspect regularly for pests and root issues
For outdoor orchids, local climate matters even more. Protect them from heavy rain, cold nights, and strong sun unless your species is suited to those conditions. For indoor orchids, the main challenge is usually preventing overwatering in low light.
Conclusion: what to do today
If you are asking, “Why is my orchid dying?” start by checking the roots, the potting mix, and the light level. Those three factors explain most orchid decline. Remove dead roots, refresh the medium if needed, and move the plant to a brighter, safer spot with careful watering.
If you want to keep learning about orchid care, look for more guidance on repotting, watering methods, and choosing the right orchid potting mix.