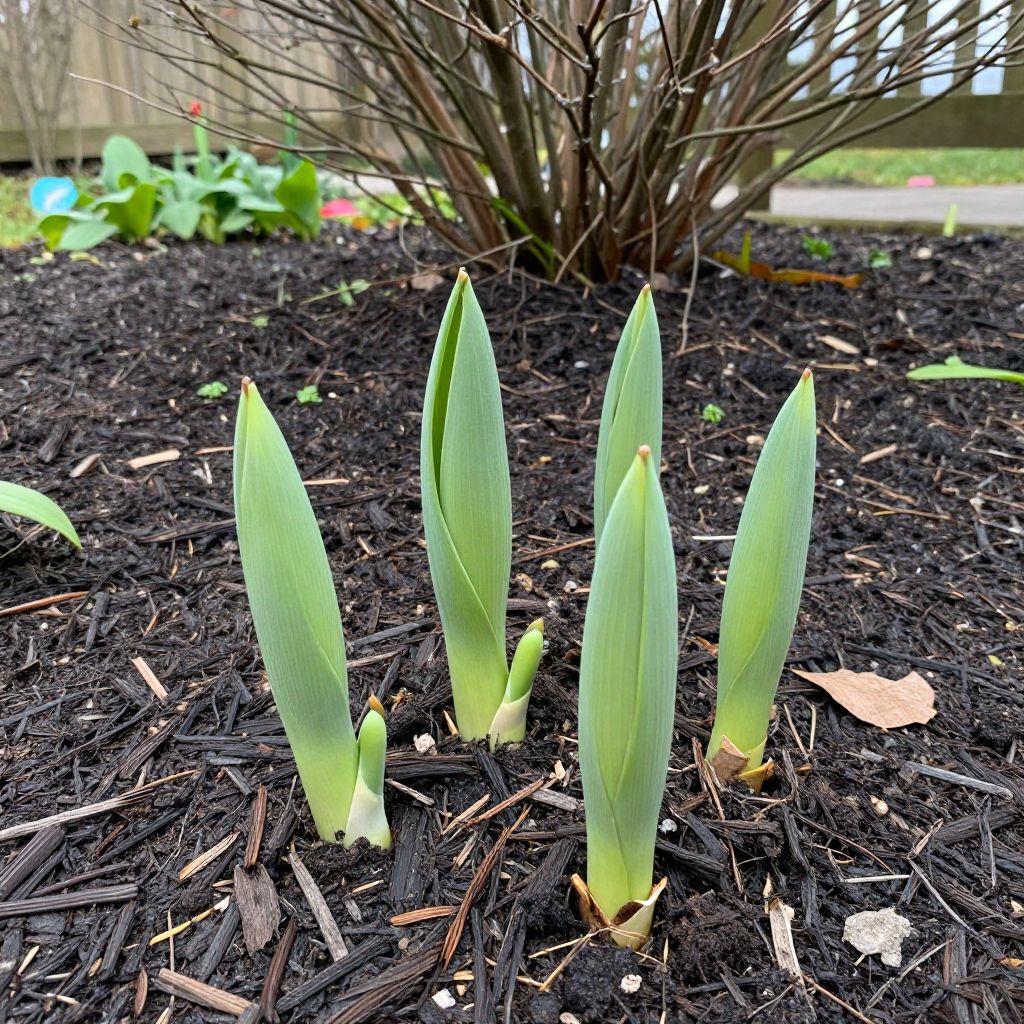
When do hostas come up? In most gardens, hostas begin emerging in spring as soil temperatures warm, often after the last hard freezes have passed. You’ll usually see the first pointed shoots, called “pips,” appear from the crown when conditions are right, but the exact timing depends on your climate, shade level, and how early spring arrives.
If your hostas look slow while other perennials are already moving, that’s normal. These shade-loving plants are often among the later perennials to break dormancy, and a cold spring can delay them even more.
When do hostas come up?
Hostas usually come up in early to mid-spring, though in colder regions they may not appear until late spring. Look for tight, spear-like shoots emerging from the crown once the soil has started to warm and the risk of hard freezes is easing. Established clumps often emerge before newly planted hostas.
What hosta emergence looks like
Hosta shoots are easy to miss at first because they emerge low to the ground and close to the crown. The new growth often looks like small green, purple, or pale “noses” pushing through mulch or soil.
Signs your hostas are waking up
- Small pointed shoots appear at the base of the plant.
- Mulch may gently lift as the crown expands.
- Leaves unfurl from tight rolls into broad, ribbed foliage.
- Multiple shoots appear around the edge of an established clump.
Don’t confuse these shoots with weeds. Hostas emerge from a central crown, while most weeds pop up randomly in the bed.
What affects the timing?
Hosta emergence is driven mostly by temperature, soil moisture, and your local climate. The same variety can come up weeks earlier in a warm zone than in a cool northern garden.
Key factors that change emergence time
- Climate zone: Warmer regions see earlier spring growth.
- Soil temperature: Hostas wake when the ground warms, not just when air warms for a day or two.
- Exposure: A sheltered bed near a house may warm sooner than an exposed border.
- Mulch depth: Heavy mulch can slightly slow early shoots, though it also protects crowns.
- Snow cover: Snow can insulate plants and delay visible emergence until thaw.
If spring is unusually cool, don’t assume your hostas are dead. They may simply be waiting for steadier warmth.
How to tell if a hosta is late or dead
Hostas are hardy perennials, but they can be slow to show themselves after a cold spring or if the crown was stressed. Before digging one up, do a quick check.
Simple check for a dormant hosta
- Gently clear away excess mulch from the crown.
- Look for firm, swollen buds or pale shoots at the soil line.
- Scratch the crown lightly with your fingernail; living tissue should look moist and pale green or white beneath the surface.
- Check for nearby heaving from frost, which can expose or damage the crown.
Wait before replacing a hosta that seems late. In many gardens, a healthy plant can still emerge after other perennials are already growing.
Best growing conditions for strong spring emergence
Healthy hostas come up more reliably when they’re planted in the right place and given decent soil. They prefer rich, moisture-retentive soil that drains well, especially in spring when wet ground can stay cold.
Site and soil basics
- Light: Part shade to shade is ideal for most hostas. Morning sun with afternoon shade often works well.
- Soil: Loose, fertile soil with plenty of organic matter helps roots and crowns develop strongly.
- Drainage: Avoid waterlogged spots, which can rot crowns.
- Mulch: A 2–3 inch layer of shredded bark, leaf mold, or compost helps conserve moisture and moderate soil temperature.
If your soil is heavy clay, improve drainage with compost and avoid planting hostas in low spots where water collects after snowmelt or rain.
Spring care when hostas start to emerge
The first weeks of growth are a good time for light maintenance. The goal is to protect tender shoots while setting the plant up for steady leaf growth.
What to do as soon as shoots appear
- Remove winter debris, but be gentle around the crown.
- Refresh mulch if it has compacted, keeping it a little away from the crown.
- Water if the soil is dry, especially during a warm, windy spring.
- Watch for frost forecasts, since tender shoots can be damaged by a hard late freeze.
Try not to pile mulch directly on top of emerging shoots. A thick mound can trap moisture around the crown and make it harder for new growth to push through.
Should you fertilize?
Hostas do not need heavy feeding to emerge, but a light top-dressing of compost in spring can support growth in poor soil. If you use a fertilizer, choose one appropriate for perennials and follow the label directions rather than guessing at rates.
Too much nitrogen can create lush, weak leaves that are more attractive to slugs and more prone to damage.
Common problems that delay hostas
If hostas are slow to come up, the issue is often environmental rather than disease-related. Still, a few problems can affect timing or plant health.
1. Frost heave
Repeated freezing and thawing can lift crowns partly out of the soil. This exposes roots to drying and can delay or weaken emergence.
Fix: Gently press the crown back into place once the soil is workable, then add a light layer of mulch.
2. Crown rot
Wet, poorly drained soil can cause the crown to soften and fail. In that case, shoots may never appear or may emerge weakly and collapse.
Fix: Improve drainage and avoid overwatering. If the crown is mushy and foul-smelling, the plant may not recover.
3. Late cold snaps
Hosta shoots can be nipped by sudden freezes after they emerge. Damage may look like browning, limp leaves, or distorted growth.
Fix: Cover shoots with a breathable frost cloth, overturned pot, or lightweight row cover when a hard freeze is forecast.
4. Slug damage
Slugs often feed on tender hosta shoots as they emerge, especially in damp shade. You may notice ragged holes before the leaves fully unfurl.
Fix: Remove hiding places, water in the morning, and use practical slug control methods suited to your garden.
How to divide or move hostas in spring
Once hostas are up, you can divide mature clumps if needed, but timing matters. Early spring, just as shoots are emerging, is often a workable time in many climates because the plant is actively growing and can recover well.
Basic division steps
- Dig around the clump carefully, lifting as much root mass as possible.
- Shake or rinse off excess soil so the crown is visible.
- Use a sharp spade or knife to separate sections with at least one healthy shoot and roots.
- Replant at the same depth in prepared soil.
- Water thoroughly and keep the soil evenly moist while the divisions settle in.
Smaller divisions may take longer to look full, so don’t expect instant landscape impact after splitting a large plant.
How to keep hostas coming up reliably year after year
Hostas are long-lived perennials when their basic needs are met. A few habits make spring emergence more dependable and reduce stress on the crown.
Good maintenance habits
- Leave the foliage in place until it dies back naturally in fall, then clean it up.
- Mulch lightly each year to protect roots and conserve moisture.
- Avoid burying the crown too deeply when adding compost or soil.
- Water during dry spells, especially in the first year after planting.
- Check for slug damage and crown problems early in the season.
Hostas perform best when they’re not crowded by aggressive roots from nearby shrubs or trees. If a plant has become weak over time, competition may be part of the problem.
When to expect full leaf growth
Seeing the first shoots is only the beginning. After emergence, hostas usually take several weeks to unfurl into full-sized leaves, depending on weather and variety. Cool nights slow the process, while steady warmth and moisture speed it up.
During this stage, keep an eye on moisture and pests. New leaves are tender, and consistent care now helps the plant build a strong canopy for summer.
Conclusion
So, when do hostas come up? Usually in spring, once the soil warms and the plant is ready to break dormancy, but the exact timing depends on your climate and weather. If yours are late, wait a little longer, check the crown gently, and focus on good soil, moisture, and drainage for healthy growth.
If you want to learn more about spring perennial care, look for related reading on dividing perennials in spring and how to mulch shade garden plants.