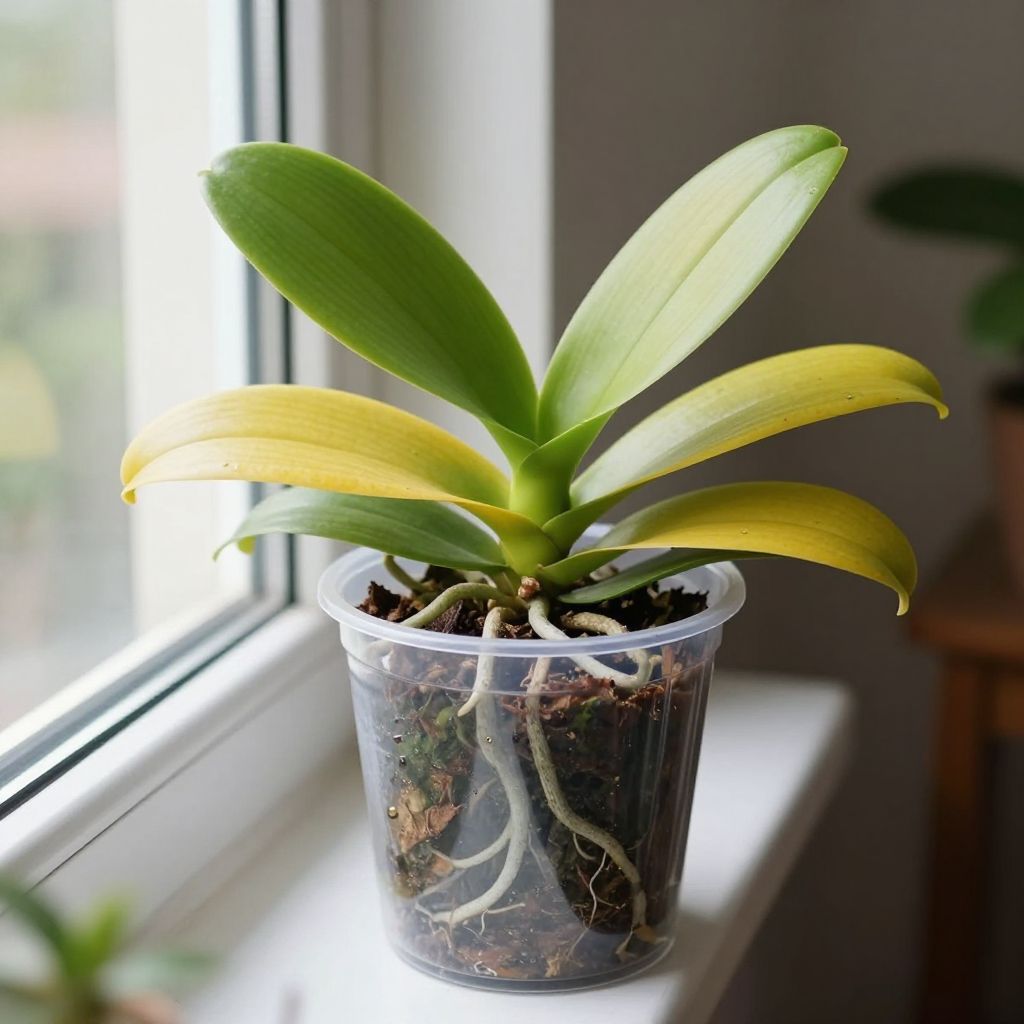
Why is my orchid leaves turning yellow? In many cases, yellowing orchid leaves are a sign of stress from too much water, too little light, or natural aging of the oldest leaf. The key is to look at the whole plant: leaf texture, root health, potting mix, and where the orchid is sitting.
Most yellow leaves can be traced to a few common care mistakes, and many orchids recover well once the problem is corrected. The trick is to tell normal leaf loss apart from a care issue, then adjust watering, light, and drainage before damage spreads.
Why is my orchid leaves turning yellow?
Orchid leaves usually turn yellow because the plant is getting too much water, too much direct sun, poor drainage, root damage, or natural aging of the oldest leaf. A single lower leaf yellowing slowly is often normal; multiple leaves yellowing at once usually points to a care problem that needs attention.
Normal yellowing vs. a problem
Before you change anything, check whether the leaf is an older bottom leaf or a newer one. Orchids commonly shed their oldest leaf from time to time, especially after blooming or as the plant redirects energy into new growth.
Signs it may be normal
- Only the lowest leaf is yellowing
- The rest of the plant looks firm and healthy
- New leaves or roots are still forming
- The yellowing is slow and even, not sudden
Signs it is a care issue
- Several leaves are yellowing at once
- Leaves feel soft, mushy, or wrinkled
- Roots are brown, hollow, or black
- The potting mix stays wet for days
- Yellowing is paired with sunburn, spots, or leaf drop
Common causes and how to fix them
1. Overwatering
Overwatering is one of the most common reasons orchid leaves turn yellow. Orchids need moisture, but their roots also need air. If the mix stays soggy, roots suffocate and stop taking up water properly, which can make leaves yellow even though the plant is wet.
What to do: Let the mix dry slightly between waterings, and never leave the pot standing in water. Water thoroughly, then allow excess to drain completely.
- Check the pot weight: a freshly watered orchid feels heavier.
- Insert a wooden skewer into the mix; if it comes out damp, wait.
- Use pots with drainage holes only.
- Empty decorative cachepots after watering.
If the roots are already damaged, you may need to repot into fresh orchid mix and trim away dead roots with clean scissors.
2. Underwatering
Less common than overwatering, underwatering can also cause yellow leaves, especially if the plant has shriveled roots or the potting mix has become too dry and water-repellent. In this case, leaves may turn yellow after first looking limp, thin, or wrinkled.
What to do: Rehydrate the plant by watering well and letting the mix absorb moisture evenly. If the medium has broken down or become crusty, repot it so water can reach the roots properly.
- Water when the roots look silvery-gray instead of green.
- Make sure dry bark or moss is actually absorbing water.
- Soak the pot briefly if the mix has become very dry, then drain well.
3. Too much direct sunlight
Orchids need bright light, but harsh direct sun can scorch leaves. Sunburn often starts as yellow patches that may later turn brown, bleached, or papery. This is especially common on windowsills with strong afternoon sun.
What to do: Move the orchid to bright, indirect light. A sheer curtain or a spot with morning sun and filtered afternoon light is often better than direct midday sun.
- South- or west-facing windows may be too intense without filtering.
- Leaves exposed to sun may feel hot to the touch.
- Sunburned tissue will not turn green again, but new growth can be protected.
4. Not enough light
Low light can also cause yellowing, especially if the plant is weak, slow-growing, or has stopped flowering. In insufficient light, orchids may lose older leaves because they cannot support all of their foliage.
What to do: Increase light gradually. Move the plant closer to a bright window, but avoid sudden exposure to strong direct sun.
- Healthy orchid leaves are usually medium green, not very dark green.
- If the plant has not bloomed for a long time, light may be too low.
- Rotate the pot occasionally so growth stays even.
5. Root rot or poor drainage
Yellow leaves often signal root rot below the surface. When roots decay, they can no longer supply water and nutrients, and the leaves begin to yellow, soften, and eventually collapse. This is especially likely if the orchid sits in compacted mix or a pot without enough airflow.
What to do: Inspect the roots. Healthy orchid roots are firm and may be green when wet or silvery when dry. Dead roots are brown, black, mushy, or hollow.
- Remove the orchid from its pot.
- Rinse off old mix gently.
- Cut away rotten roots with sterilized scissors.
- Repot in fresh orchid bark or another suitable orchid medium.
- Use a pot with ample drainage and airflow.
Do not bury the crown of the orchid, and do not pack the mix too tightly.
6. Natural aging after flowering
Many orchids, especially common Phalaenopsis orchids, naturally drop an older leaf now and then. If the plant is otherwise healthy, this is not a crisis. The oldest leaf near the base often yellows first, then dries and detaches.
What to do: Leave the leaf alone until it loosens naturally. Do not pull it off forcefully, because that can tear healthy tissue.
- Watch for new roots or a new leaf at the crown.
- Keep care steady rather than overcorrecting.
- Remove only fully dry, detached tissue.
7. Temperature stress
Orchids dislike sudden temperature swings. Cold drafts, hot air from heaters, or a chilly windowsill can stress the plant and contribute to yellowing leaves. This is especially important indoors during seasonal changes.
What to do: Keep orchids away from vents, radiators, open doors in winter, and cold glass at night if temperatures drop sharply.
- Avoid placing orchids directly against frosty windows.
- Keep them out of hot, dry airflow from heaters.
- Try to maintain stable indoor conditions as much as possible.
8. Pests and disease
Scale, mealybugs, and fungal or bacterial problems can all weaken an orchid and lead to yellowing leaves. Pests often hide along leaf joints and undersides, while disease may show up as soft spots, blackened areas, or spreading yellow patches.
What to do: Inspect the plant closely and isolate it from other houseplants if you suspect pests or disease.
- Look under leaves and around the crown for insects or sticky residue.
- Remove heavily damaged leaves only if they come away easily.
- Improve air circulation and avoid wetting the crown repeatedly.
- Use clean tools and wash hands after handling an affected plant.
How to troubleshoot a yellowing orchid leaf step by step
If you are not sure what is wrong, work through the plant in order. This helps you avoid guessing and makes it easier to spot the real cause.
- Check which leaf is yellowing. A single older lower leaf is less concerning than multiple leaves.
- Feel the leaf. Soft and mushy suggests overwatering or rot; dry and papery suggests sunburn or dehydration.
- Inspect the roots. Healthy roots are firm; rotten roots are brown or hollow.
- Examine the potting mix. If it smells sour, stays wet too long, or has broken down, repotting may be needed.
- Review the light. Bright indirect light is ideal for most home orchids.
- Look for pests or spots. Catching problems early prevents further decline.
What healthy orchid care looks like
Most houseplant orchids do best in a loose, airy medium rather than ordinary potting soil. Orchid bark, sphagnum moss, or a blend made for orchids helps roots breathe and drains excess water quickly.
Watering basics
Water based on the plant’s needs, not on a fixed calendar. In warmer, brighter conditions, orchids may dry faster; in cooler or darker months, they need less water.
- Water when the mix is nearly dry but not bone-dry for long periods.
- Always let excess water drain away.
- Avoid watering into the crown if the plant sits in cool, low-airflow conditions.
Light and placement
Most orchids grown indoors prefer bright, filtered light. An east-facing window is often a good starting point, while brighter windows may need a sheer curtain.
- Leaves should look green and firm, not dark and floppy.
- Too much sun can bleach leaves; too little can weaken the plant.
- Adjust placement seasonally as sun intensity changes.
Repotting and medium care
Orchid mix breaks down over time and holds too much water as it ages. If the medium is old, compacted, or sour-smelling, repotting can prevent yellowing caused by root stress.
- Repot when the mix decomposes, not just on a strict schedule.
- Use a clean pot with drainage holes.
- Handle roots gently and trim only dead tissue.
What not to do
When an orchid leaf turns yellow, it is easy to overreact. Avoid these common mistakes:
- Do not keep watering more often just because the leaves look stressed.
- Do not place the plant in stronger sun without acclimating it first.
- Do not cut off a leaf that is still partly green and attached firmly.
- Do not leave the orchid sitting in water inside a decorative pot.
- Do not use dense regular houseplant soil for most orchids.
When to remove a yellow orchid leaf
Only remove a leaf when it is fully yellow or brown and comes away easily. If it is still partly green, it is still feeding the plant. Premature removal can wound the stem and invite infection.
If the leaf is soft, blackened, or foul-smelling, remove it carefully with a sterilized blade and address the underlying cause right away.
Conclusion
If you are wondering why is my orchid leaves turning yellow, start by checking water, roots, and light before assuming the plant is failing. A single aging leaf may be normal, but multiple yellow leaves usually mean the orchid needs a care adjustment. Inspect it today, correct the problem, and your plant has a much better chance of recovering.
For more practical orchid care, you may also want to read about how to repot orchids and orchid watering and root care basics.