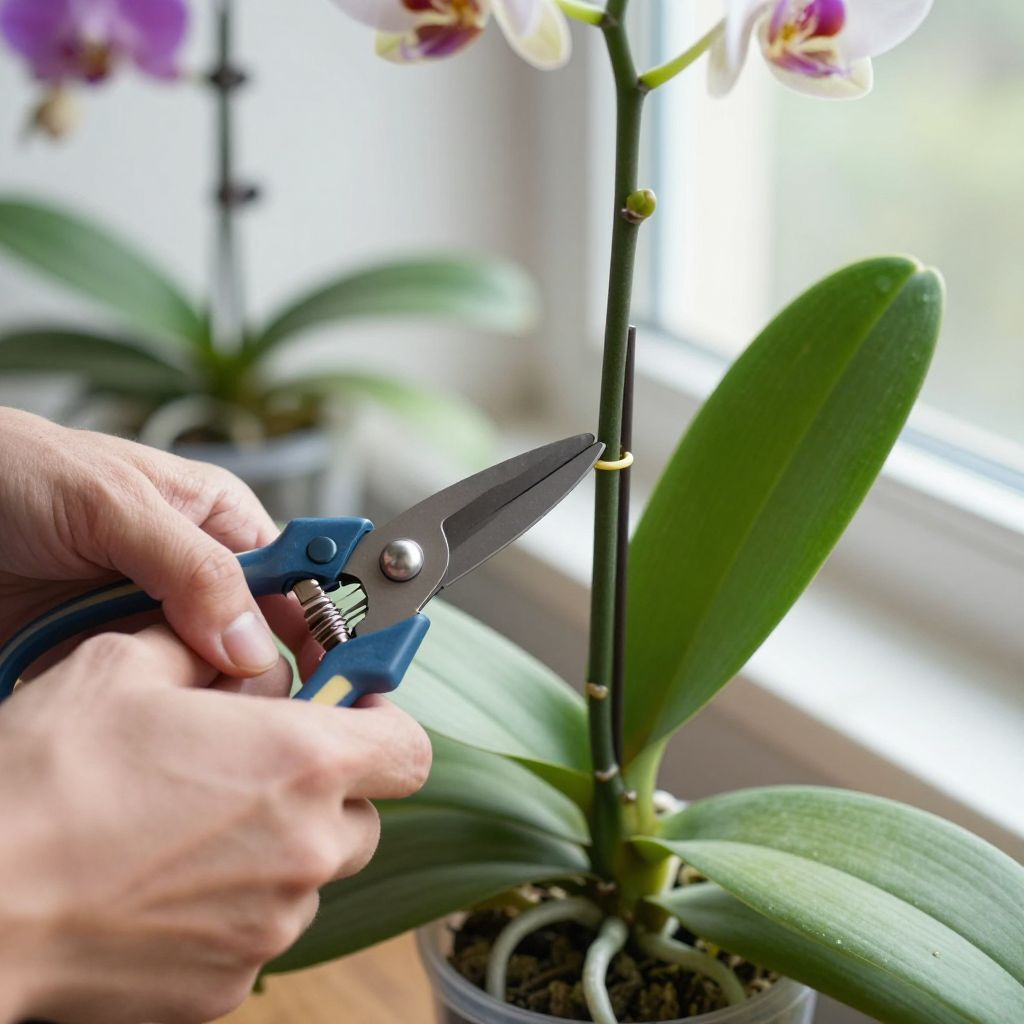
Wondering where to cut orchid stem without damaging the plant? The right cut depends on whether the flower spike is still green, turning brown, or completely dry. A careful snip can encourage reblooming, while the wrong cut can waste the plant’s energy or invite rot.
Most home orchids, especially Phalaenopsis moth orchids, are best pruned after flowering by cutting just above a node on a green spike or removing a fully brown spike at the base. The goal is to match the cut to the stem’s condition and the orchid’s overall health.
Where To Cut Orchid Stem?
If the orchid stem is still green and healthy, cut it about 1/4 inch above a node, usually the second or third node up from the base. If the spike is brown and dry, cut it off near the base, leaving about 1 inch of stem above the leaves. Never cut into the crown or healthy leaves.
How to tell whether to cut or leave the orchid spike
Before you reach for the pruners, inspect the flower spike closely. The best cutting point depends on whether the orchid is still actively supporting a green stem or has finished with a dead one.
Green spike
A green orchid spike can still photosynthesize and may produce a side branch or rebloom. In this case, you can trim above a node to encourage a new flower shoot.
Yellow, tan, or brown spike
When the spike turns yellow, tan, or brown, it is no longer useful to the plant. At that point, cut it back near the base so the orchid can redirect energy to roots and leaves.
Soft, blackened, or mushy tissue
If the stem looks diseased or rotting, remove the damaged portion promptly. Cut back into firm, healthy tissue and sterilize your tool before and after the cut.
Best cutting locations for common orchid spikes
Different orchids are pruned a little differently, but the most common houseplant orchid is Phalaenopsis. If you are unsure which orchid you have, start with the spike’s condition rather than guessing by variety.
For a healthy green Phalaenopsis spike
- Find the nodes, which look like small bumps or leaf-like joints along the stem.
- Choose the second or third node up from the base.
- Make a clean cut about 1/4 inch above the node.
This leaves enough stem for a possible side branch while avoiding damage to the node itself.
For a spent brown spike
- Trace the spike down toward the base of the plant.
- Cut about 1 inch above where the spike emerges from the plant.
- Avoid cutting flush against the crown or leaves.
Leaving a small stub helps prevent accidental injury to the plant and gives you a safer margin if the tissue shrinks slightly after cutting.
For orchids with multiple spikes
If your orchid has more than one flower spike, assess each one separately. One stem may still be green while another is spent, so you do not need to treat them the same way.
How to cut an orchid stem safely
A clean cut matters as much as the location. Orchids are sensitive to wounds, and dull tools can crush the stem instead of slicing it cleanly.
- Use sharp scissors, pruning snips, or a sterile blade.
- Wipe the tool with rubbing alcohol before cutting.
- Hold the spike steady with one hand.
- Make one smooth cut at the chosen point.
- Dispose of dead stem pieces so they do not sit in the potting mix.
Important: Always sterilize tools if the orchid shows signs of disease, rot, or pest damage. This helps prevent spreading problems to other houseplants.
Should you cut orchid stems after flowering?
In many cases, yes. Once the flowers fade, the plant needs a decision point: either keep a green spike for a possible rebloom or remove a dead one so the orchid can recover. The right choice depends on the plant’s vigor and your growing conditions.
When leaving the spike can help
- The stem is green and firm.
- The orchid has healthy leaves and roots.
- You want a chance at a side branch and earlier flowers.
When cutting the spike is better
- The stem is brown, dry, or collapsing.
- The plant looks weak or has poor roots.
- You want the orchid to focus on rebuilding energy.
Some growers prefer to cut green spikes back after the last flower drops to encourage stronger future blooms. Others leave a healthy spike in place. Both approaches can work, but a weak plant usually benefits more from removal than from trying to rebloom immediately.
What not to do when pruning orchid stems
Common pruning mistakes can slow recovery or create infection points. A little caution goes a long way with orchids.
- Don’t cut into the crown. The crown is the center where leaves emerge, and damage there can be serious.
- Don’t leave ragged tears. Use a sharp tool for a clean cut.
- Don’t trim healthy leaves. Leaves store energy and should stay intact unless damaged.
- Don’t remove green roots. Orchid roots may look unusual, but green or silvery roots are often healthy.
- Don’t overwater after pruning. Wet conditions around a fresh wound can encourage rot.
How orchid care affects reblooming after you cut the stem
Pruning alone does not guarantee new flowers. After you cut the stem, the orchid still needs good light, proper watering, and stable conditions to produce another bloom cycle.
Light
Most indoor orchids bloom best in bright, indirect light. A window with filtered sun is often ideal. Too little light can delay reblooming, while harsh direct sun can scorch leaves.
Watering
Water when the potting mix is nearly dry, not on a fixed calendar. Orchid roots need air, and constantly soggy mix can cause root rot. Let excess water drain fully.
Potting mix and drainage
Orchids are usually grown in a chunky bark-based mix or another fast-draining medium, not in regular garden soil. Good drainage helps roots stay healthy after pruning and during bloom recovery.
Humidity and air movement
Moderate humidity and gentle air circulation support healthy growth. Stagnant, damp air can encourage fungal issues, especially around fresh cuts.
What to expect after cutting the orchid stem
After you prune, the plant may either produce a side shoot from a node or rest and grow a new spike later. The timing depends on the orchid’s health, light levels, and season.
- If the spike was green and the plant is vigorous, a side branch may appear in a few weeks.
- If the spike was removed at the base, the orchid may focus on leaf and root growth first.
- If the plant is stressed, reblooming may take longer or not happen until conditions improve.
Do not force bloom production with heavy fertilizer or frequent repotting. A healthy root system is the real foundation for future flowers.
Seasonal and indoor growing considerations
For indoor orchids, the best time to prune is usually right after flowering, whenever that happens in your home. Outdoor orchids, where climate allows them, should be handled according to local temperatures and the plant’s growth cycle.
In cooler or lower-light months, orchids often grow more slowly. If your plant is already stressed by short days, cold windows, or dry indoor air, keep pruning conservative and focus on overall care.
Common problems after pruning and how to fix them
The cut end turns brown
A little drying at the cut is normal. If the browning spreads or the tissue becomes soft, trim back to firm tissue with a sterilized tool.
The spike shrivels after a green cut
That can happen if the plant decides not to support a side branch. Remove the dried portion later if it turns brown.
Leaves wrinkle or roots decline
This usually points to a watering or root problem, not the pruning itself. Check the potting mix, roots, and drainage before assuming the cut caused the issue.
No rebloom appears
Some orchids need time. Improve light, keep watering consistent, and avoid overfertilizing. A healthy plant may still take months to flower again.
Quick checklist before you cut
- Identify whether the spike is green or brown.
- Use clean, sharp, sterilized tools.
- Cut green spikes 1/4 inch above a node if reblooming is the goal.
- Cut brown spikes near the base, leaving a small stub.
- Keep the crown, leaves, and roots intact.
- After pruning, maintain bright indirect light and careful watering.
If you want more orchid care guidance, look for advice on repotting, root health, and light levels so the plant can recover well after pruning. For broader indoor plant care ideas, you may also find related reading on orchid repotting basics and how to tell if orchid roots are healthy.